Lab 7: Hardware Shaders
Introduction
For our final lab this quarter we'll be looking at how professional game developers add flash into their games while maintaining performance. Specifically, we'll be examining how we can control the hardware graphics pipeline through small GPU programs (hardware shaders) to create a variety of interesting graphical effects. Through the use of hardware shaders, we'll be able to achieve a multitude effects that would normally be too slow and impractical to perform through the CPU.
Programmable GPUs
To understand why shaders are useful, we must understand what makes the GPU more suitable for certain tasks than the CPU. Unlike CPUs, GPUs are highly-parallel pipelined devices which are quite efficient at performing select operations commonly found in computer graphics applications. Due to their limited instruction set, less space on the die is used for cache and more is used for logic allowing for greater processing throughput. Because of the specificity of design, modern GPUs can achieve an average 50x to 100x fold improvement in performance over the CPU for many select computational tasks.
A hardware shader, at the lowest level, is simply a binary program that is uploaded to the GPU through the system bus. During a specific stage in the pipeline, with the stage determined by the type of shader being used, the shader transforms the input and passes it to the next stage in the pipeline. Unlike the fixed-function pipelines of a few years ago, developers today have the power to control how the data is transformed within the pipeline allowing them to do more with the powerful GPUs found in all recent PCs and gaming consoles.
Hardware Shader Types
Hardware shaders come in three types: vertex, geometry and fragment. As mentioned in the previous section, each is responsible for modifying the data at a different stage of the pipeline and passing it onto the next stage. In the image below (borrowed from NVIDIA Cg Manual) we can see the basic structure of the pipeline (note: geometry shaders are missing).
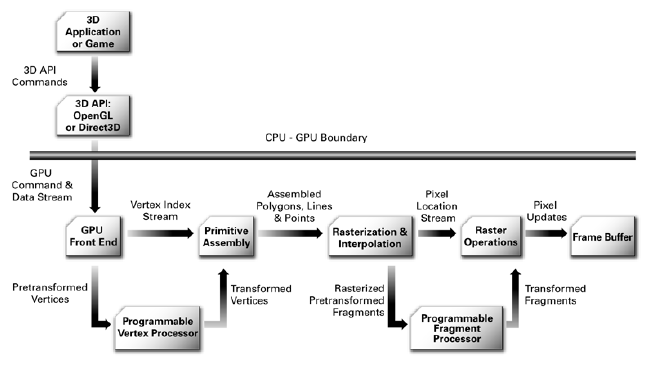
Vertex shaders are executed first in the pipeline. Their task is to modify per-vertex attribute information (position, normal, UV coordinates, per-vertex color, ect...) and project the 3D vertex data down into 2D clip space for assembly and rasterization. Vertex shaders are useful for accelerating tasks such as skinning or morphing.
After the vertex data is transformed and projected down, assembly of the vertices into graphics primitives (lines, polygons) is performed. The geometry shader controls the assembly process allowing for the graphics hardware to create new graphics primitives from the input vertices on the fly. However, note that geometry shaders are a relatively new feature for GPUs, and many recent cards and APIs do not perform it (at the time of this writing DirectX 10 or OpenGL w/ NVIDIA extensions, and DirectX 10 compatible hardware is required).
Finally, the assembled, projected graphical primitives are rasterized, and ready to be composited with the current contents of the frame buffer. The rasterization stage is responsible for taking the projected primitives and turning them into fragments. A fragment can be though of as a pixel that carries additional information such as z-depth, alpha, and texture coordinate values. A fragment shader allows you to transform these fragments before compositing them with the current framebuffer contents.
Through hardware shaders we are given very powerful control over the graphics pipeline and GPU hardware.
Creating a Shader
As I mentioned in the previous section, shaders are simply binary programs that are uploaded to the GPU, however, I did not exactly say how you would go about writing such a shader. Traditionally, shaders were all written by hand in assembly. Fortunately, for you, times have changed and high-level languages have developed to ease the burden.
Currently there are three commonly used high-level shader languages: HLSL (Microsoft), GLSL (OpenGL), Cg (NVIDIA). For today's lab we will be using the most portable language, Cg. Unlike HLSL or GLSL, the Cg API can be used either with DirectX or OpenGL. Cg also has C-like syntax and features which should make its usage relatively more intuitive than GLSL or HLSL.
Cg documentation may be found at the NVIDIA site. The user manual should show you the syntax and semantics of a Cg program.
Ogre currently abstracts away all of the Cg API. In fact, all you will need to do is write your shader program, create an Ogre material which references that shader program, and possibly set some input parameters to your shader in your code. Ogre will then handle all of the management tasks.
My recommendations are to start off writing a very simple shader (color the character a given color). Use the Ogre documentation as a reference on creating the material script. If you need some examples, check the Cg programs and materials in the media folder. There are also Ogre samples in the cs134 directory which use shaders (cel-shading/compositor demo). Using the combination of the Ogre documentation, the Cg manual, and the samples you should have a steady foundation to begin writing your own shader.
Lab Requirements
Since it is nearly the end of the quarter, and each group is deeply entrenched in the final project, the requirement for this lab will be adapted towards achieving your final goal. For this final lab you will need to do only one of these two things per team:
-
Add one interesting use of shaders into your game. The shader must be coded by you. The algorithm does not need to be original.
-
Reuse at least 3 different existing shaders. Some shader examples may be found here.
For anyone considering to become a professional game developer I highly encourage you to do the first task even though it is more difficult than the second. It should hopefully provide more insight as to how game developers achieve their visual fidelity, plus it should give you a leg up in the job interviewing process.
Shader Implementation Recommendations
Here are some ideas for those interested in implementing their own shader. Be warned: some of these ideas may be a bit advanced and may require some considerable effort.
-
Alternative material shading algorithm (Cel shading, sketch rendering, glass)
-
Fog
-
Normal/Parallax Mapping
-
Motion Blurring
| Close |